How To Stamp Clay
Stamping clay is a relatively straightforward process, but there are a few factors that contribute to the success or failure of it.
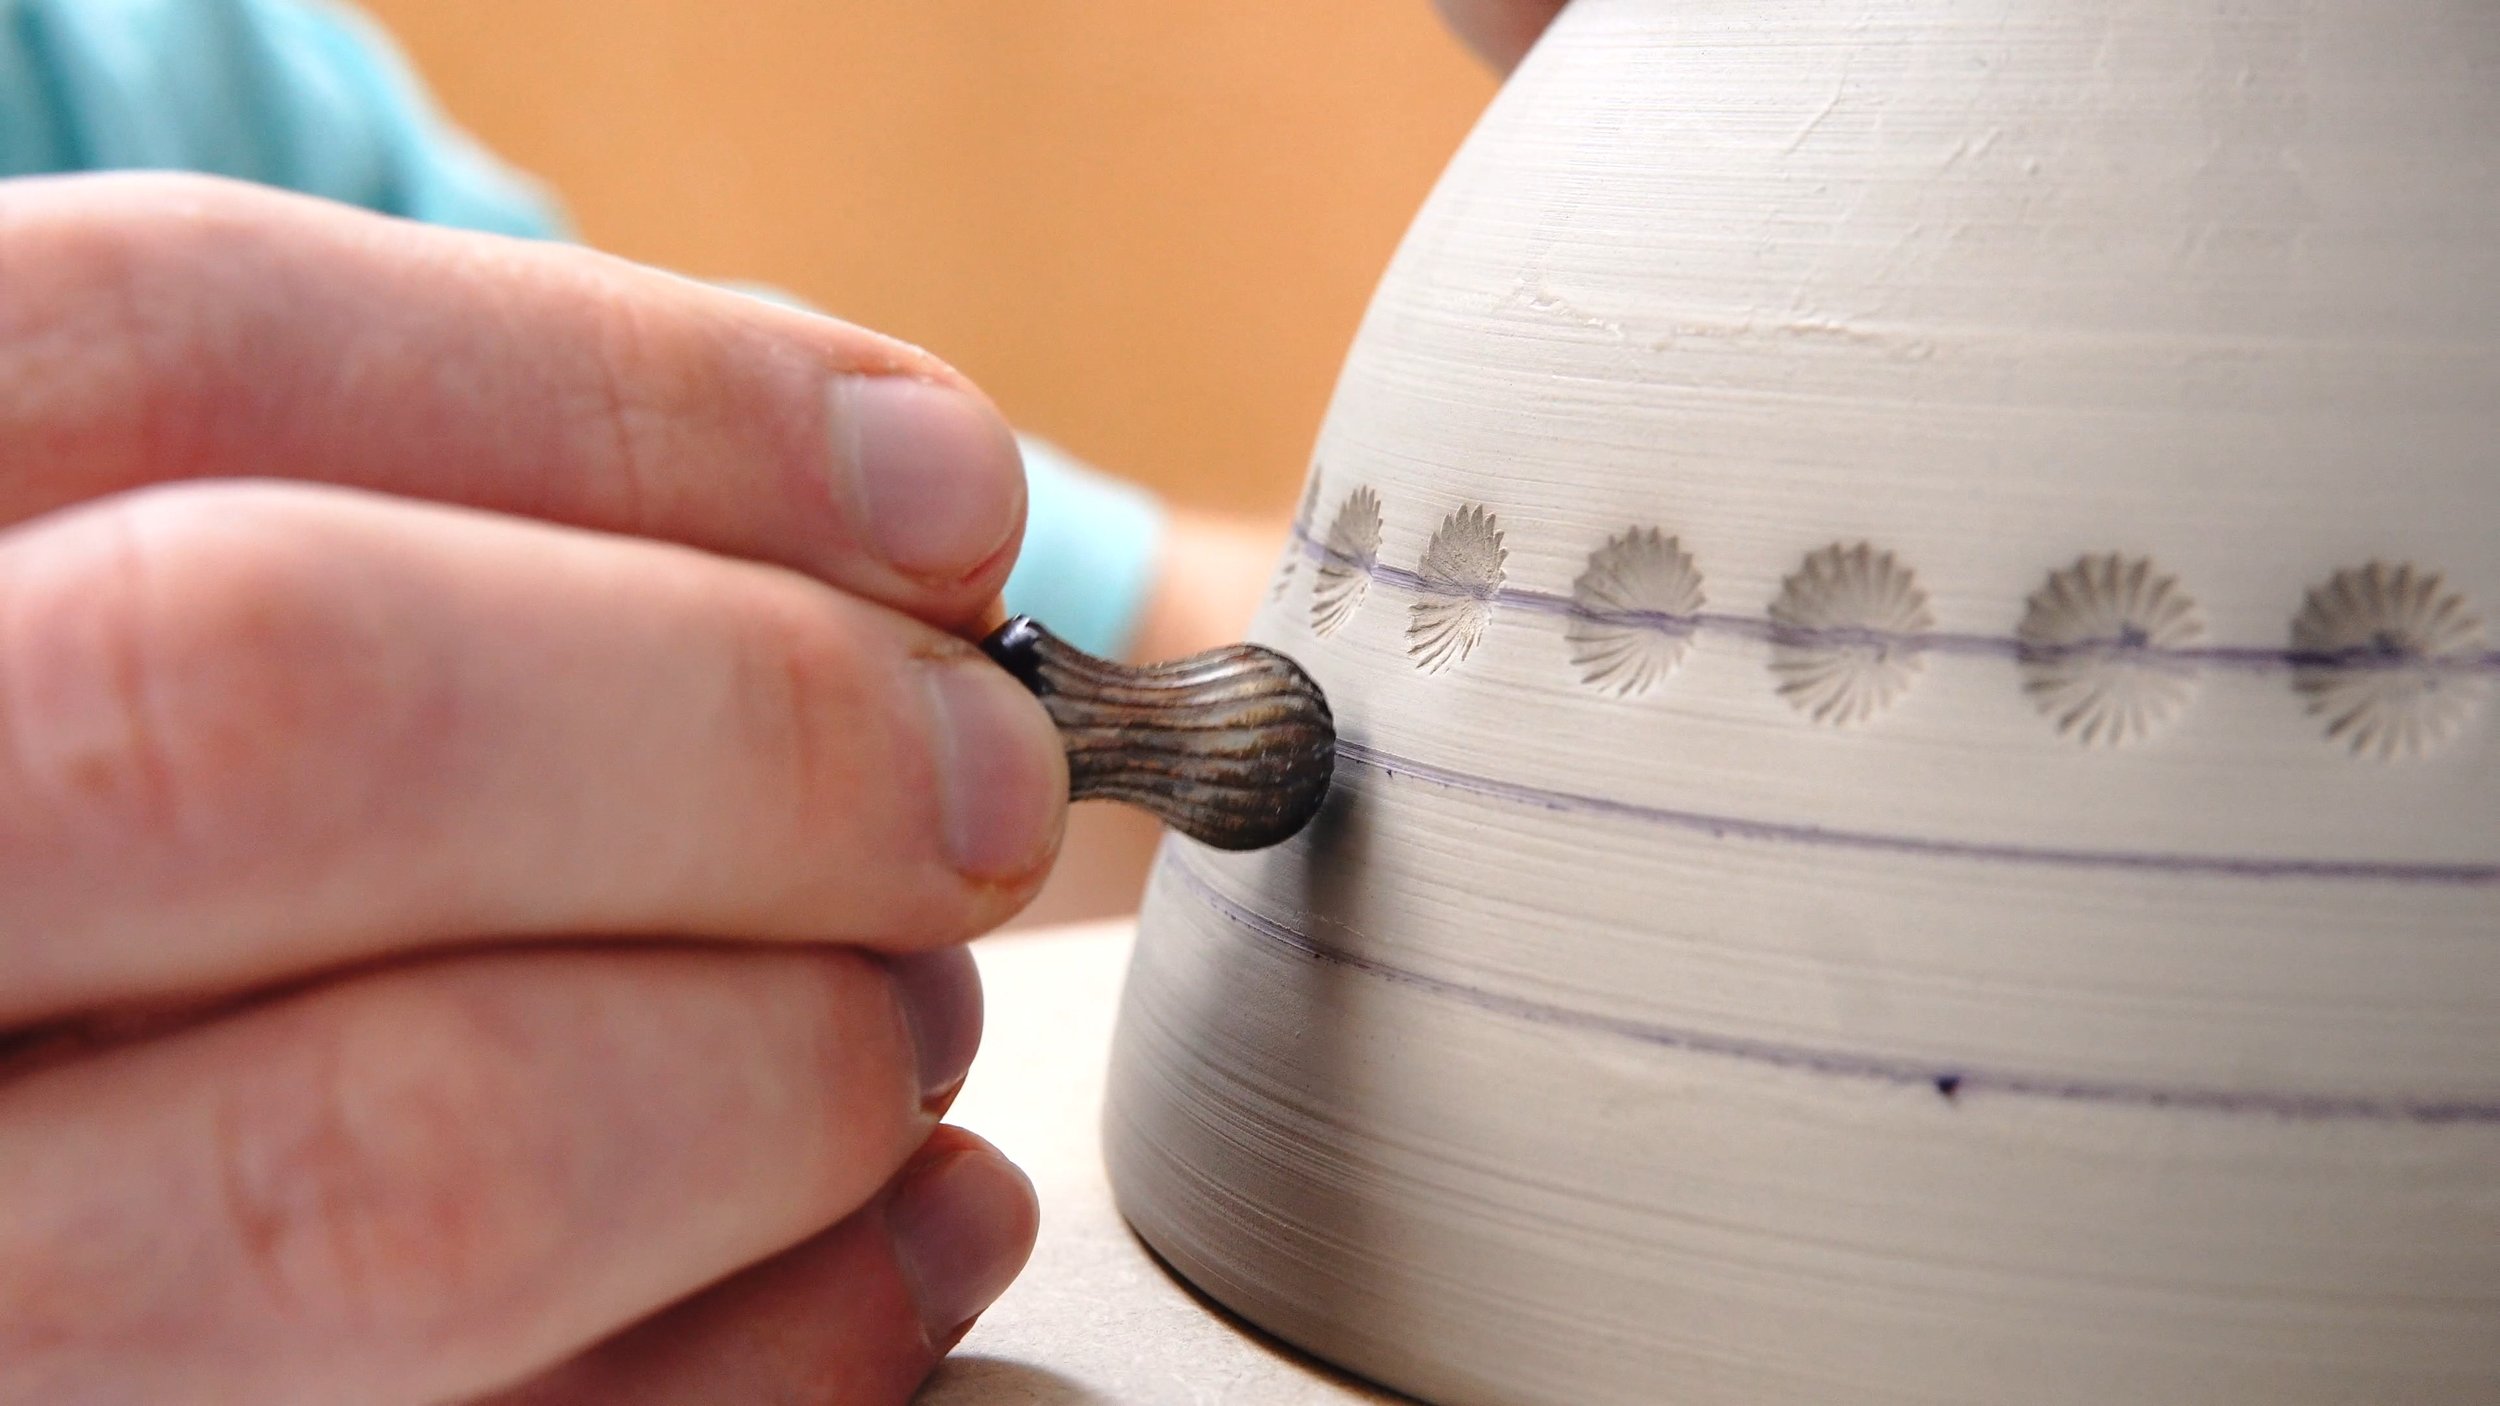
The first thing to consider is the purpose. Clay is usually stamped to get a design on the side being stamped (e.g. a logo stamp) but can also be stamped all the way through the wall to give variation on the other side (e.g. Peacock Eye/Pebble designs). These two goals are quite different.
The next consideration is the clay firmness. This drastically changes the ability of the clay to deform, as well as the clarity of the stamped design. Different levels of dryness will give totally different stamped results (or will fail instead).
A related point is the thickness of the clay. This changes the way the clay behaves and will change the result, particularly if the clay is unsupported.
Then there is the shape and size of the design being stamped, as well as the material the stamp is made from.
Finally, the stamping technique determines how the pressure is distributed across the stamp.
Stamping A Logo Design
A logo/maker’s mark is probably the most common use of a clay stamp, but the concepts are pretty similar for any instance where the goal is to get a clear design on the side that is being stamped.
Typically, this would also come with the goal of minimal/no deformation on the reverse of the stamped surface. The amount of deformation depends on the clay thickness and dryness, as well as whether the clay is supported or not.
Clay Dryness
To get a clean and crisp stamp, there is a suitable range of clay dryness. Too soft and the stamp will be deep but the edges will be messy and the tool might stick. Too dry and the stamp will barely have enough depth to be visible (but with very crisp edges). I stamp my logo after trimming, but I trim with drier clay than some other potters. You might have to time the two processes differently to allow the clay to firm up before stamping if you prefer trimming sooner.
Clay Support
Thinner clay will naturally deform more under the same pressure. This means that you can get a better stamp in thicker clay, with more depth to the design and less overall deformation. Alternatively, supporting the reverse side will allow a deeper stamp into thin clay without much deformation. This means you can get a great quality of stamp into a surface that’s against the batt surface (e.g. coasters or the inside base of a bowl).
This deformation can be a real problem for the clarity of a stamped design, as a previously flat surface bends away from the stamp and leaves an area in the middle with less of a clear mark than the edges.
Stamp Design
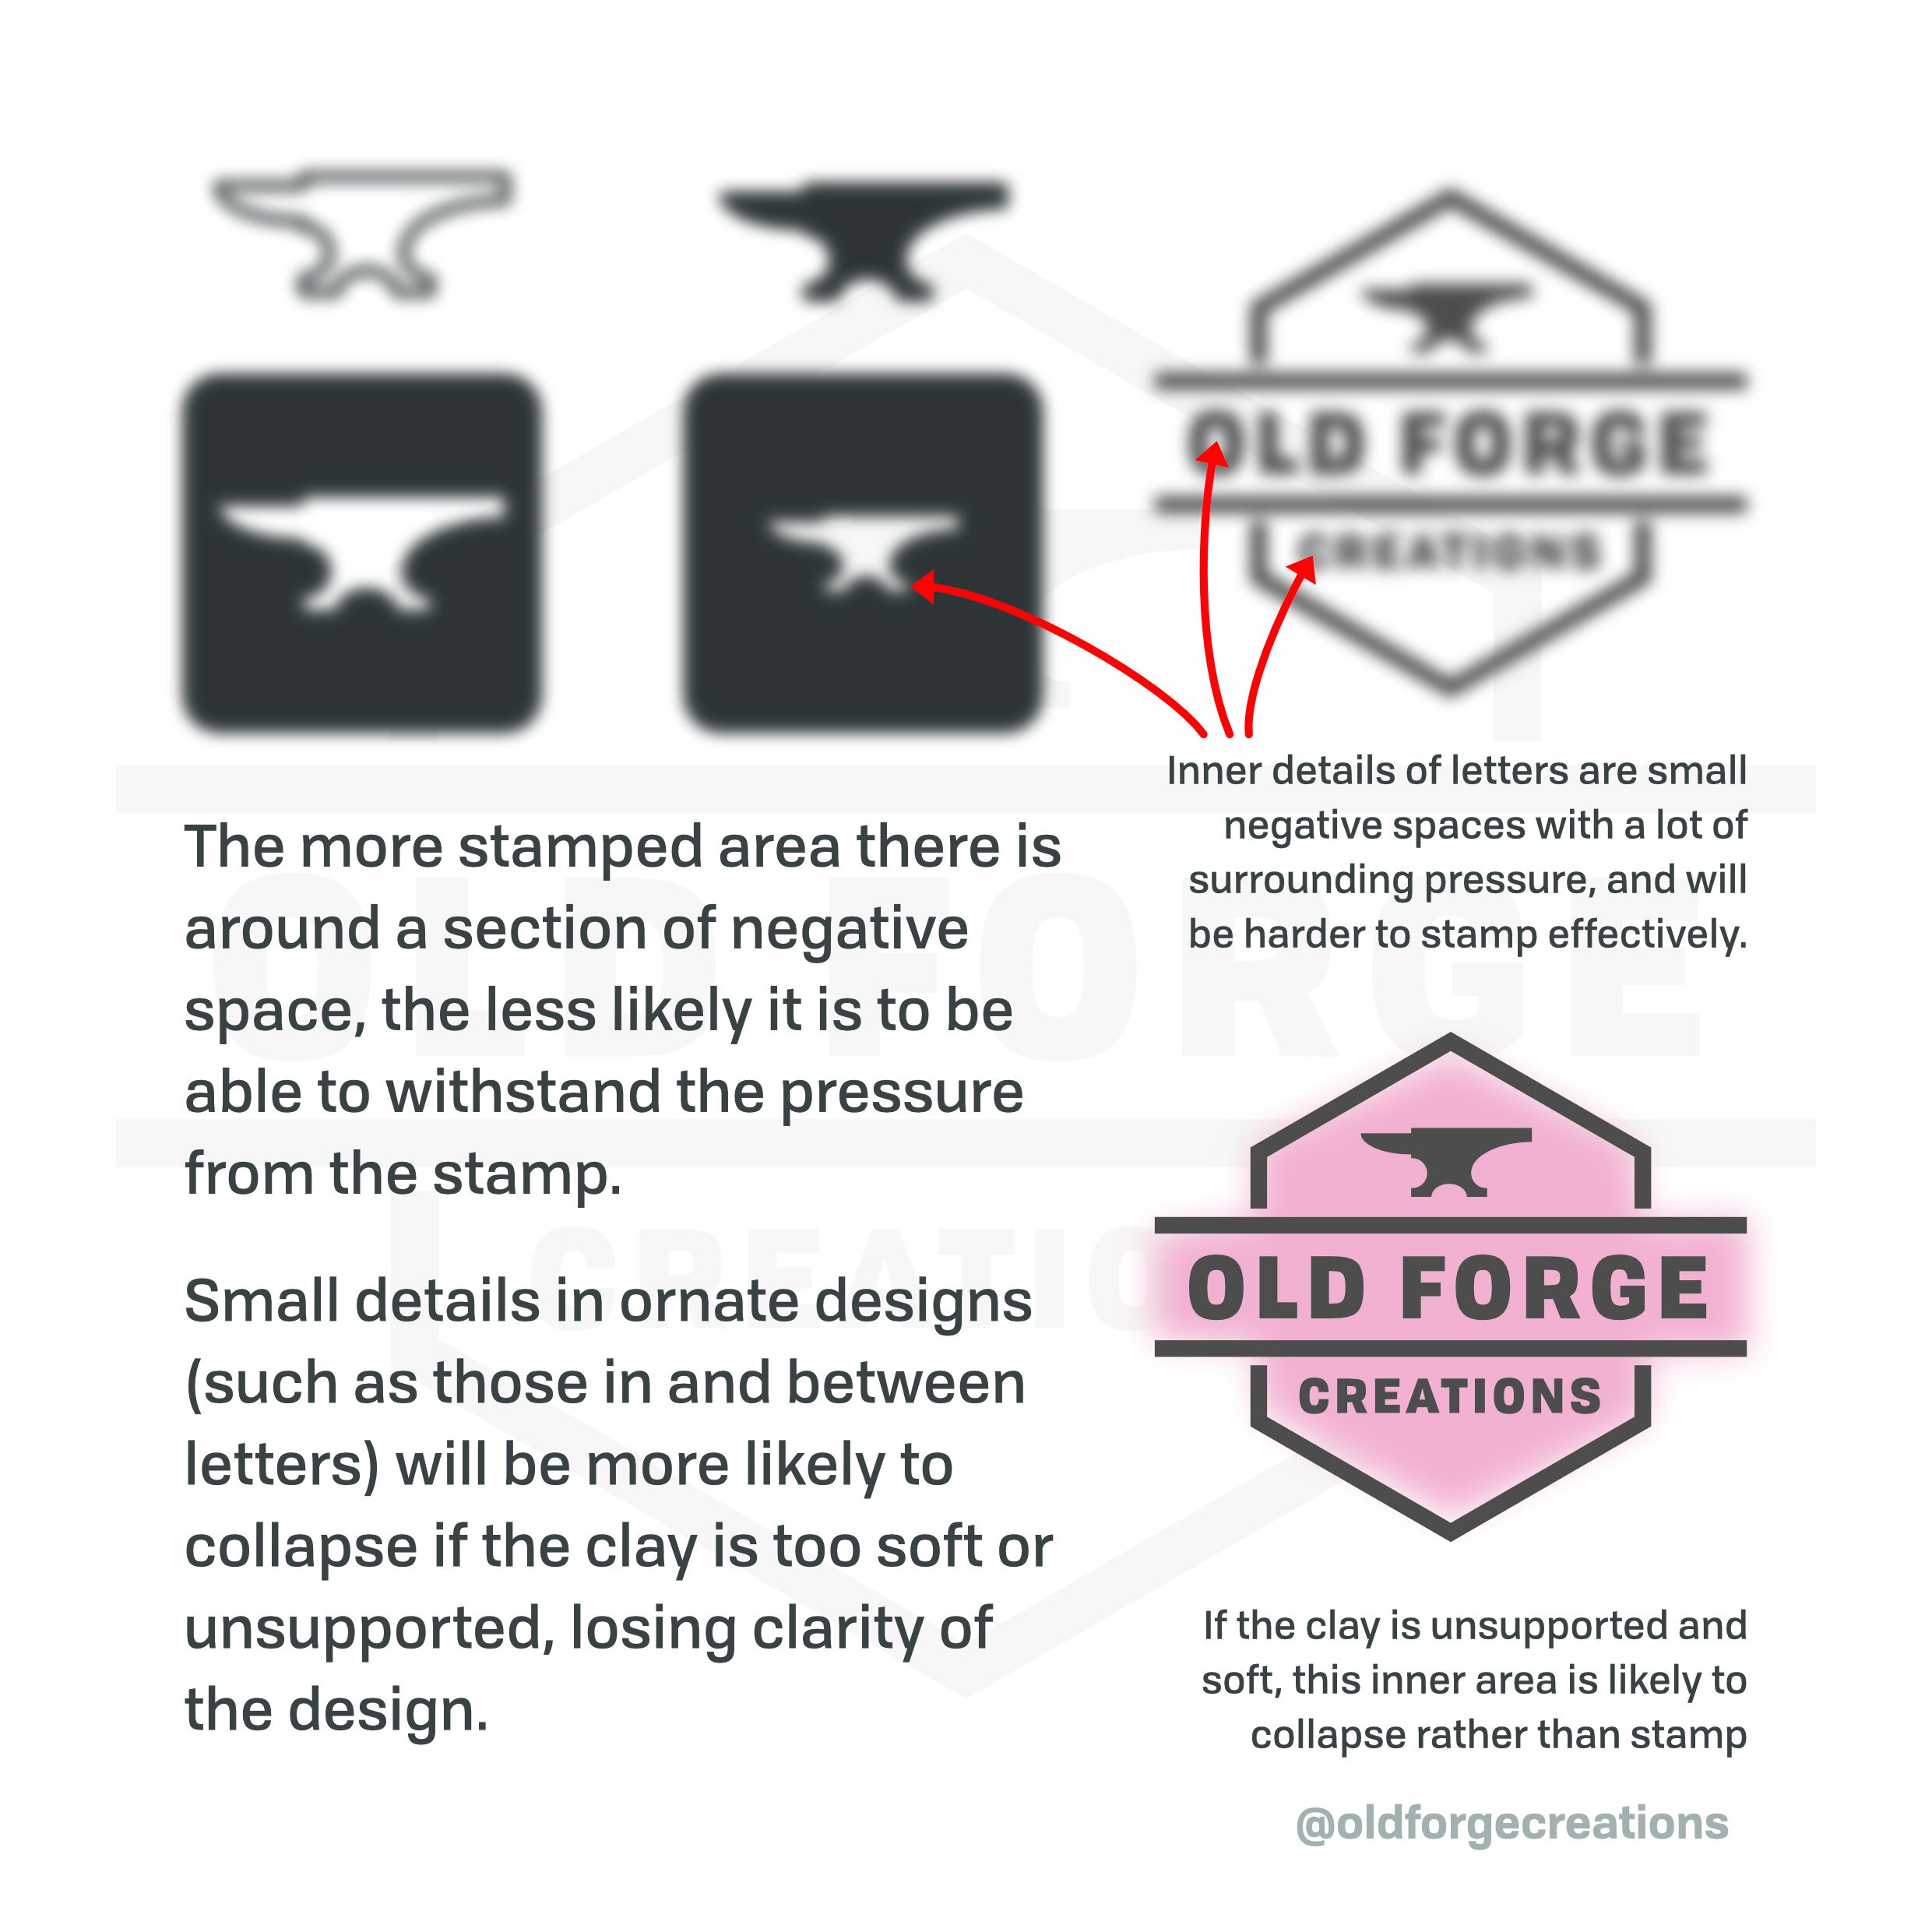
The design and size of a logo stamp is important. The greater the surface area being stamped, the harder it will be to get a good impression without deformation. The surface area is both a product of the design and the scale. These two factors are important when designing a logo stamp, as a logo stamp doesn’t have to be your full logo. You can simplify, reduce, or alter the design to increase the effectiveness of it as a stamp.
To preserve all the details of the stamp, the clay must be able to resist deformation in the area around the stamp, including negative spaces like the reversed out example above. This is made easier by having a smaller stamping surface area and more space between elements. Each point of stamping will apply pressure to the surrounding clay, which can be imagined a bit like applying a gaussian blur effect. The pressure diffuses from the stamped area into the clay around it:
Stamp Process
The stamping process is important too. If you’re stamping into a supported piece of clay (e.g. a coaster on a batt) then you can just press down hard and it’ll probably work perfectly. The pressure from the stamp is applied evenly across the surface and the clay directly under the stamp area is forced out of the way.
If you’re stamping an unsupported clay wall, things get a bit more complicated. The clay will want to both move out of the way directly under the stamp area (leaving the stamped design) and bend the overall wall. The balance of these two is down to the wall thickness, clay dryness, stamp design, and stamping process. To reduce the amount of overall deformation while still getting a good clarity of stamped detail, you want to focus the pressure on a smaller section of the stamp. This can be done by stamping with a slight angle and rolling the pressure around, rather than coming straight down and applying pressure evenly. You have to be careful not to let the stamp move as you do this though!
Stamping A Design Effectively:
Use clay at the right dryness
Stamp in a location that’s supported, either by the piece structure or by adding a support
Use an effective stamp design
Apply pressure gradually and in an intentional way.
Stamping For Surface Variation
Stamping to get variation on the other side of the clay wall has a very similar list of considerations, some are the same but most need to be the other way around for it to work effectively.
Clay Dryness
Clay is more plastic (able to deform) when it’s wetter. If you try to bend clay that’s too dry, you’ll get cracks on the outside of the bend where it’s not able to stretch far enough. If you bend softer clay, that won’t happen. We need the reverse surface of the clay to be soft enough to bend without the cracks forming.
However, the softer the clay, the more the entire wall will deform rather than just the area being stamped. The stamp will also stick to the surface if the clay is soft.
This means we ideally want a gradient of dryness, with the outside being drier than the inside. The great news is that this is easily achieved by drying pieces upside down, as the outside is able to dry and the inside traps moisture and stays softer. The inside wall can also be misted with water before stamping to soften it if needed.
Clay Support
Obviously we don’t want to support the clay on the other side of the stamp with this process, but supporting the rim of the piece will help keep the overall shape the same while allowing deformation of the wall. I invert my pieces on a soft fabric surface (an old tee shirt) and press them firmly into it when stamping the wall. This supports the rim and helps keep overall deformation to a minimum.
The shape of the overall wall will help determine how much the wall deforms, with a rounded convex shape forming a natural arch and getting significantly more strength from that than a flat sided shape.
Stamp Design
This is less important here. I use a pebble for the Pebble pieces and a rotary grinding bit for the Peacock Eye pieces, but really you can do it with anything you want. Rounded shapes will have fewer issues when getting a deep stamp, where shapes with sharper edges can put more stress on the clay.
Stamp Process
This is the same as for logo stamping, but even more so. You want to be focusing the pressure on a small area and rolling the stamp around to gradually bend the clay. Stamping slower and with less pressure will give a much better result, and trying to stamp too quickly will bend the entire wall of the piece.
Stamping For Surface Variation:
Dry the piece to get a gradient of clay firmness, with the outside being more dry than the inside
If the clay isn’t the correct gradient, add a misting of water on the inside until it is
Use a stamp that gives the internal design you want
Apply gentle pressure and roll the stamp to get more depth to the design and avoid collapsing the overall form
If you like this sort of content and want to support the creation of more, I now have a Patreon specifically for it or a page on my website if you just want to make a single donation.


